
Server-Client (Networking)
Communication between two Java apps using CheerpJ and Tailscale.
This tutorial will take you step by step over a networking scenario of communication between two Java applications running in the browser with CheerpJ. You will learn how to set up CheerpJ and Tailscale to run a Java Client application in the browser that requires communication via java.netSocket and java.net.ServerSocket with a Server application.
If you are not familiar with how CheerpJ and Tailscale work together, we invite you to take a look at our Networking guide. You can download the full template of this tutorial here.
Pre-requisites:
- A text editor to create and edit an HTML file
- A simple HTTP server to host your page locally.
- A modern browser like Chrome, Firefox or Safari.
- A Tailscale account (explanation later in this tutorial)
1. The Java applications
The applications we will be running in this tutorial consist of a Java Server app and a Java Client app that communicate with each other via Sockets simulating a chat room. This application example has been based on TechVidvan![]() tutorial and you can find the source code extensively explained here
tutorial and you can find the source code extensively explained here![]() .
.
The idea is to run both applications in the browser with the help of CheerpJ and no Java installations on your machine!
2. Tailscale
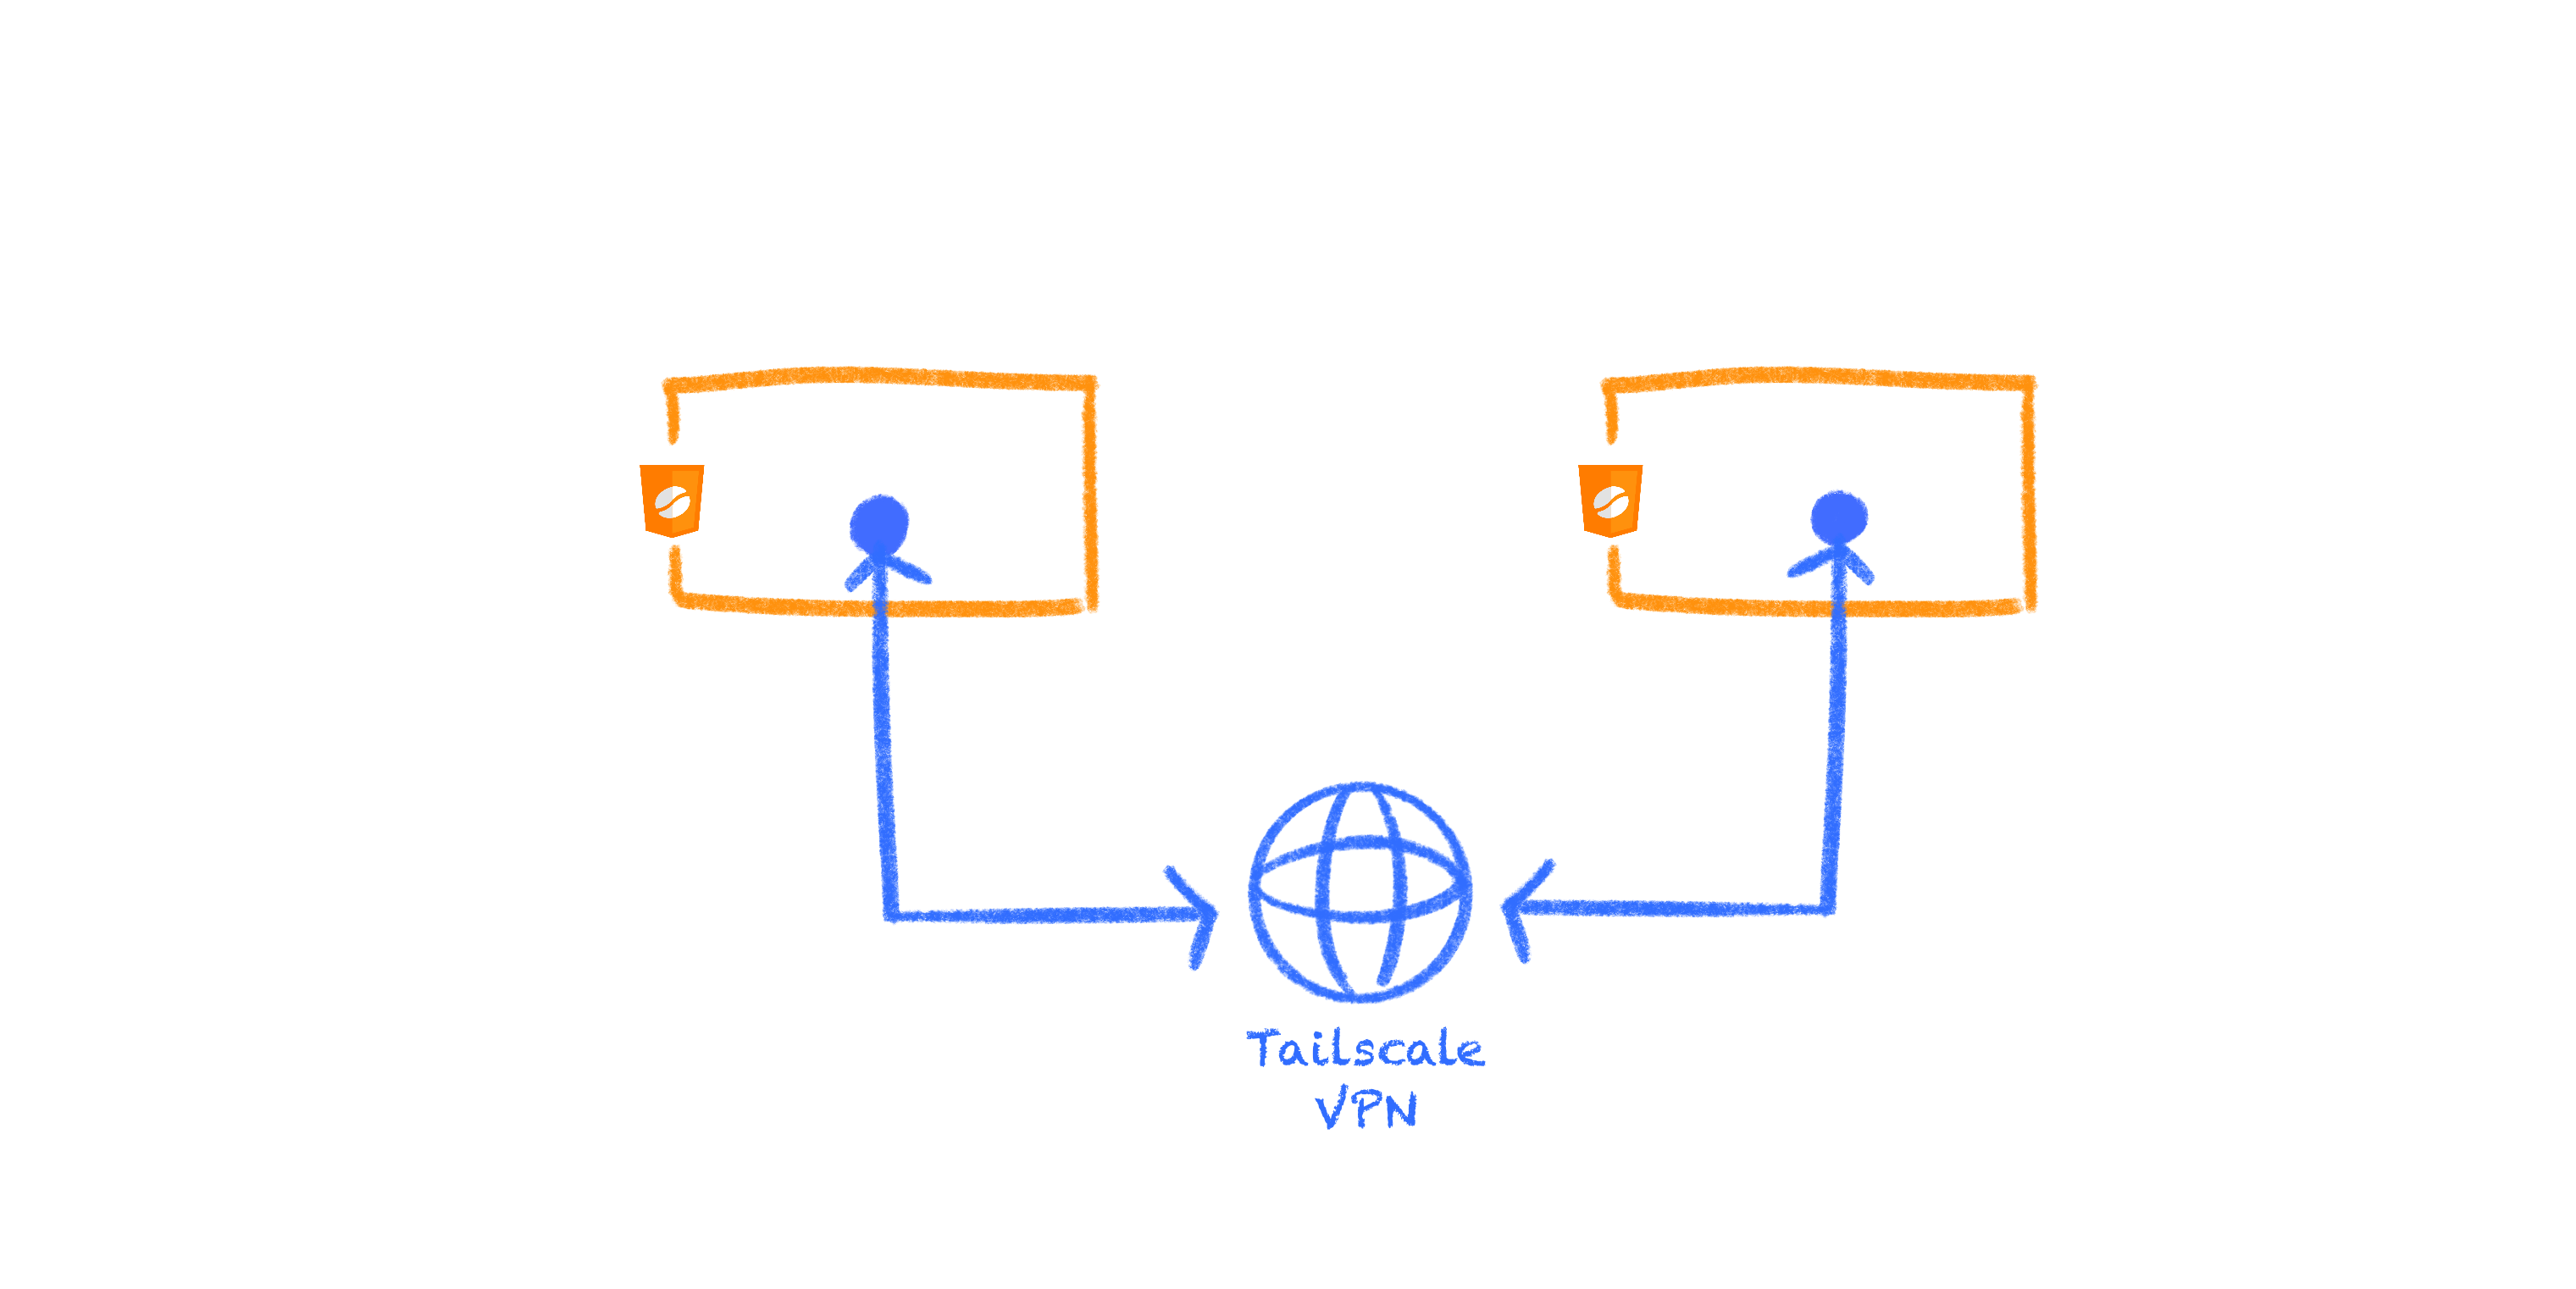
If you have read our Networking Guide, you learned that enabling non-HTTP (s) networking when using CheerpJ requires a third-party VPN service. This is very easy to do using Tailscale, which is extensively supported by CheerpJ.
2.1 Setting up Tailscale
You will be creating a Tailscale network and connecting both Java apps to this network as nodes. A Tailscale node is a term that refers to a combination of a user/machine connected to Tailscale network.
- Create a Tailscale account and log in
 . By creating an account you will be creating a Network.
 - Create the appropriate auth keys here and reserve, you will be using these keys to authenticate the Java applications into your Tailscale network later.
Tailscale auth keysYou can create the type of auth key that works best for you by mixing and matching the options in the Tailscale keys menu. If you care about the Tailscale quota keep in mind to remove the unused devices manually or by using ephemeral keys.
3. Setting up the project
Let’s create a project directory with two subdirectories inside, one for the Client and one for the Server and place the corresponding files:
- Create the project directory tree:
mkdir -p ServerClientTutorial/{Server, Client}- Paste the application’s JARs inside the corresponding folder.
- Create an HTML file inside each subdirectory, let’s name it
client.htmlandserver.htmlYour project tree should look like this:
└──ServerClientTutorial └──Server ├── Server.jar └── server.html └──Client ├── Client.jar └── client.html3.1 The Server application
- Open the
server.htmlfile and paste the following:
<!doctype html><html lang="en"> <head> <meta charset="utf-8" /> <title>Server</title> <script src="https://cjrtnc.leaningtech.com/3.0/cj3loader.js"></script> </head> <body> <input type="text" id="ip"></input> <script> (async function () { await cheerpjInit({ tailscaleAuthKey: "PasteYourKeyHere", tailscaleIpCb: (ip) => { let el = document.querySelector("#ip"); el.value = ip; }, }); cheerpjCreateDisplay(800, 600); await cheerpjRunJar("/app/Server.jar"); })(); </script> </body></html>What is happening here?
- The
<head>script loads CheerpJ. cheerpjInitinitialises the CheerpJ runtime environment. The Tailscale auth key is passed for authentication.cheerpjCreateDisplaycreates a graphical environment to contain all Java windows.cheerpjRunJarexecutes your application!tailscaleIpCbis used to retrieve the IP address once the application is connected to the Tailscale network. We are using it to clearly display the IP address on the document./app/is a virtual filesystem mount point that references the root of the web server this page is loaded from.
- Copy the first auth key you generated in the previous step and paste it as a string replacing “PasteYourKeyHere”.
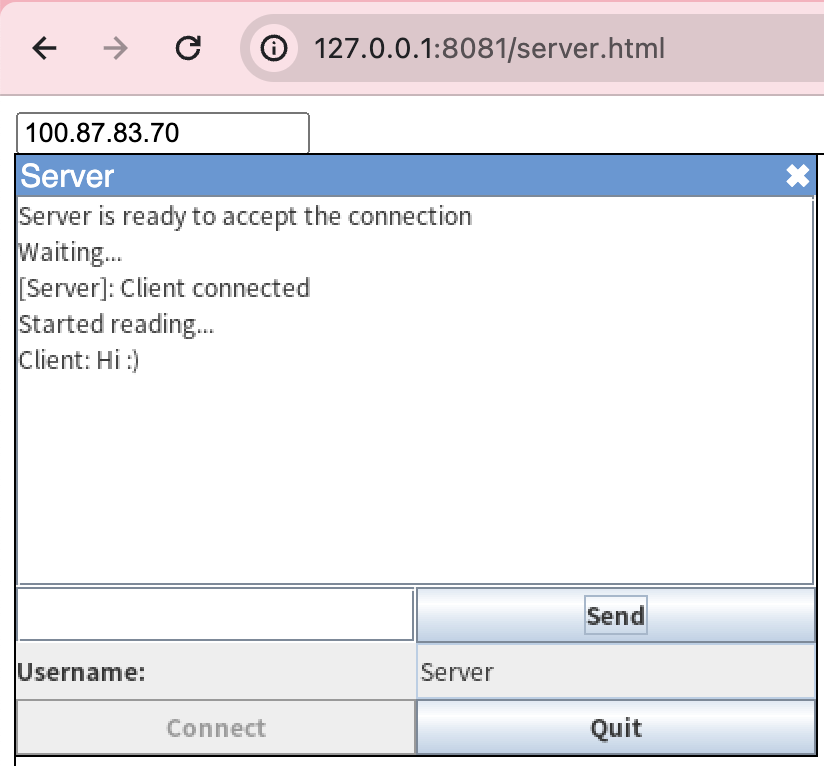
- Now you are ready to serve this page and run the Server application in the browser. Simply run a http-server inside the
Serverdirectory. For example:
cd ServerClientTutorial/Serverhttp-server -p 8080- Now open a browser tab and visit the address you are serving. It should be something similar to
http://127.0.0.1:8080/server.html. - Above the application display you will see the assigned IP address for the Server app. Please reserve it as you will need it later to connect the client with the server. You can also consult the IP address by visiting the Tailscale Dashboard.
- You will see the CheerpJ loading animation for a brief moment and your application should show.
3.2 The Client application
- Open the
client.htmlfile and paste the following code:
<!doctype html><html lang="en"> <head> <meta charset="utf-8" /> <title>Client</title> <script src="https://cjrtnc.leaningtech.com/3.0/cj3loader.js"></script> </head> <body> <input type="text" id="ip"></input> <script> async function start(ip) { await cheerpjInit({ tailscaleAuthKey: "PasteYourKeyHere", }); cheerpjCreateDisplay(800, 600); await cheerpjRunJar("/app/Client.jar", ip); }; let el = document.querySelector("#ip"); el.addEventListener("keydown", (e) => { if (e.key == "Enter") { start(el.value); } }); </script> </body></html>What is happening here?
cheerpjRunJarThe second parameter corresponds to the args object which is an argument for the Java Main method. we are passing the API address of the Server application so the Client can communicate with it.
- Copy the second auth key you generated previously and paste it as a string replacing “PasteYourKeyHere”.
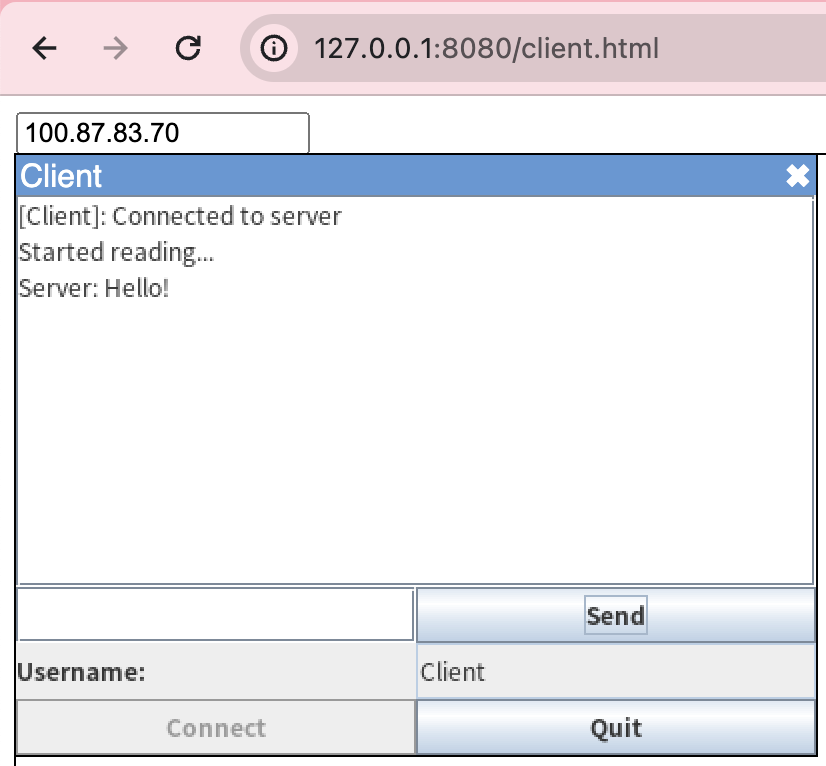
- Now you are ready to serve this page and run the Client application in the browser. Simply run a HTTP server inside the
Clientdirectory with a different port than the one used for the Server app. For example:
cd ServerClientTutorial/Clienthttp-server -p 8081- Now open a browser tab and visit the address you are serving. It should be something similar to
http://127.0.0.1:8081/client.html. - Copy the Server’s IP address and paste it in the input field and hit enter. The Client app will try to connect to the Server app this way.
- Once provided the IP address, you will see the CheerpJ loading animation for a brief moment and your application should show.
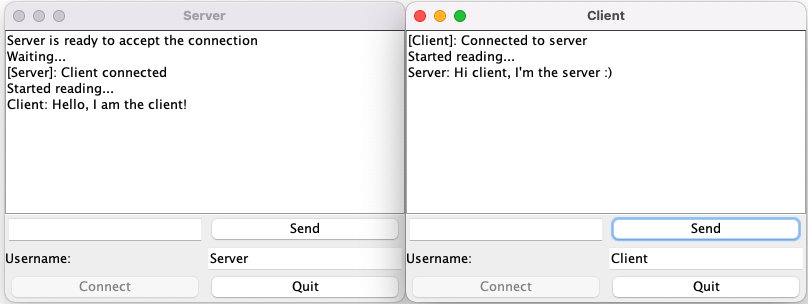
4. Final test
Now that you have both Client and Server applications running with CheerpJ, you should be able to input an username and connect in both apps to establish the connection. Test by sending messages from one application to the other one.
You can download the full template of this tutorial here or visit the GitHub repository![]() .
.
Credits
The Java applications used in this networking tutorial belong to TechVidvan![]() . You can find their tutorial with the source code here
. You can find their tutorial with the source code here![]() . Some minor edits have been made to adapt to this tutorial.
. Some minor edits have been made to adapt to this tutorial.